Aaron Fisher Magic

  • Training Programs | Magic Shop
  • Magic Articles
  • Easy Card Tricks
  • Contact

Aaron Fisher Magic Articles

Aaron Fisher authors some of the world's best magic trick guides and advice for beginners and advanced magicians. His magic articles and blogs about 'performing magic' are known for their authority and dedication to detail.

Card Trick – The Autopilot Bottom Palm

February 23, 2016 By Aaron Fisher

CARD TRICK – The Autopilot Bottom Palm:

Our Easy to Master Method
by Aaron Fisher

With special thanks to Conjuror Community Contributor Alex Sladman!

Want to learn a great new card trick? If you can steal a selected card from the deck, you can produce it from any impossible location you can think of, from your pocket, to a wallet to a sealed piece of fruit. For that reason, it’s one of the most valuable moves in the card trick arsenal of any close-up magician.

At the same time, most of our clients find this to be a daunting, even scary sleight to tackle. Whether you’ve never palmed a card at all, or you’ve been palming for 20 years, you’ll find the method we’re about to share in this easy card trick will make the secret art of palming easier than ever to master.

BTW – At my most recent online class at Conjuror Community, I shared one of my favorite routines using this palm that makes this sleight even easier to accomplish (the routine itself does nearly all the work for you!).

Card Trick Power – How to Find Your Personal Palm Position

With Special Thanks to Alex, one of our Conjuror Community members and contributors, for doing such an excellent job preparing this article!

card trick
Pic 1

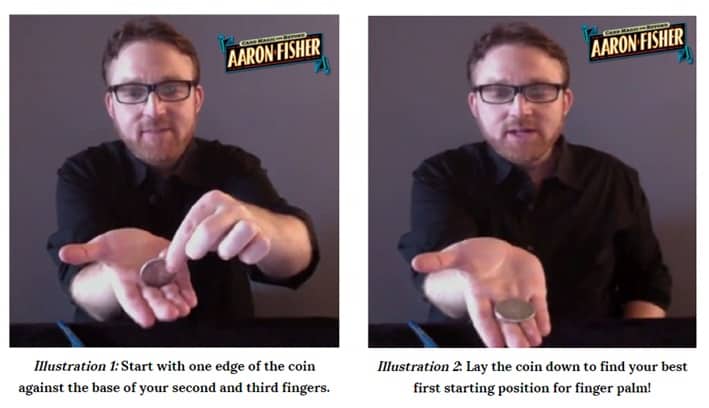
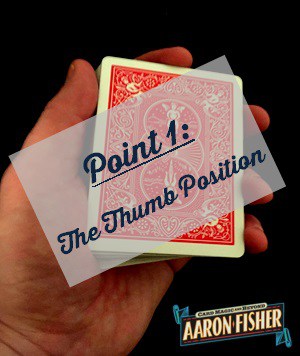
One of the major features of the left hand palm position you’re about to discover is that the card is not palmed as you might normally think, between the fourth finger tip and the ball below the thumb – as in the right hand position used for the top palm or side steal. (See Pic 1)

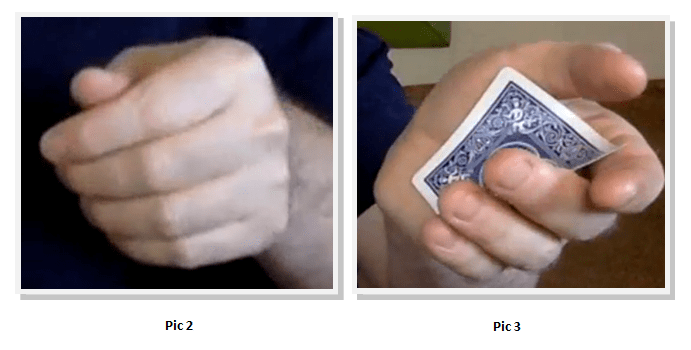
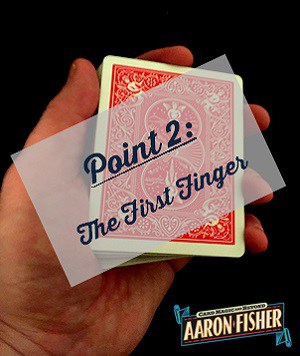
Rather, it’s a more economical position that does two major things for you at the same time. First, it lets you palm the card with less motion and more economy. That means it’s more deceptive. Second, this will makes it much easier to hold your hand in a natural position when the card is in palm. (See Pic 2)

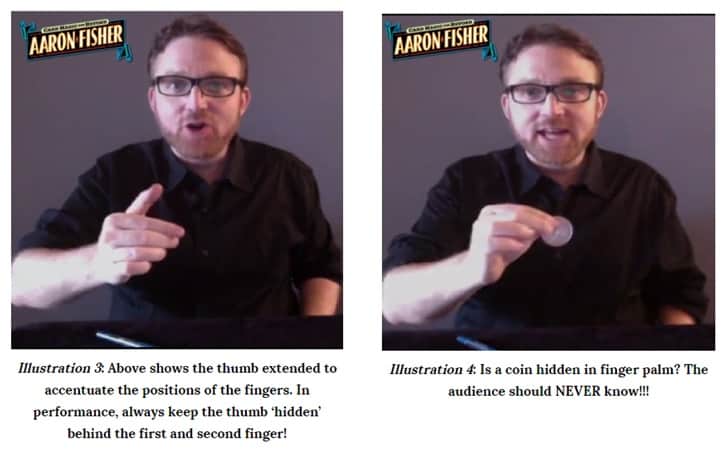
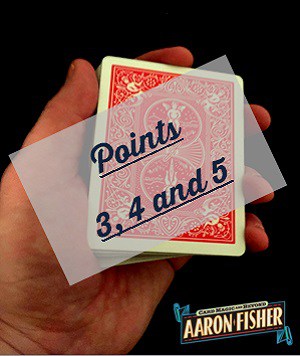
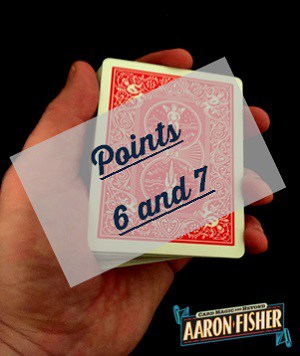
Start by placing the right top corner of the card into the pad of the third finger and rest the bottom left corner at the ball of flesh close to the fork of the thumb. Apply slight pressure between these two contact points, curling your hand and allowing the card to bend until the card touches the inside of your palm. (See Pic 3)


card tricks you can do

This is your “hypothesis” position – just like most every card trick, as there really is no ‘one size fits all solution’. In fact, after you test the palming action we’ll describe, your personal palm position will likely change a bit. As you practice, the lower left corner of the card will adjust a bit until it sinks into your personal perfect position.

You will notice that there is a corner of the card slightly sticking up the first finger, as well as a tiny piece of the card sticking out of the back of the palm. To hide this, cover the corner of the card with your left thumb. There is also a very slight flash in the back – in a position no spectator will ever see. (See Pic 4 and 4.1)

cool card tricks

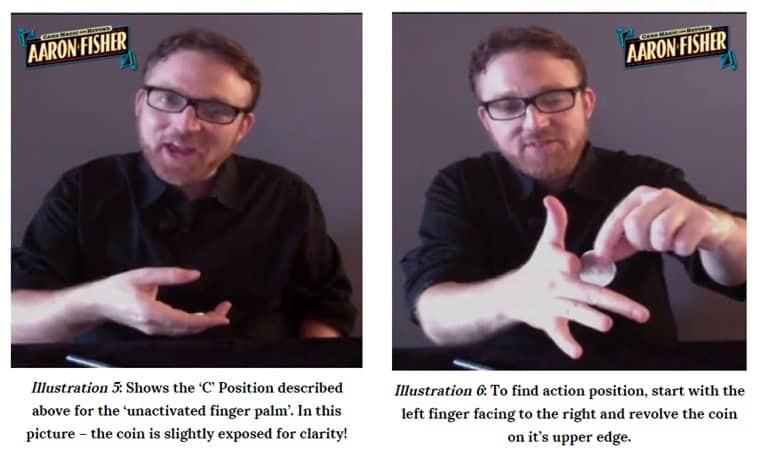
Before we describe the palming action itself, keep this in mind: The cards will get bent…a whole lot. In ‘card trick class’ that’s one thing they never tell you about learning to palm cards – and it’s a good thing. That’s how we’ll ensure you never get caught, or even suspected of trickery, in performance.


alex-sladman-headshot

CONTRIBUTIONS BY:

Alex Sladman is a talented sleight of hand artist and a contributing member of Conjuror Community. He’s responsible for the clear, easy to follow instructions in this post!


Card Trick Power – The Autopilot Bottom Palm

Now that we covered your palm position ‘hypothesis’, let’s look at the action of the palm itself. Like most bottom palms, this method is derived from the Erdnase Bottom Palms in Expert at the Card Table. However, thanks to your Personal Bottom Palm Position and unique approach you’re about to discover, in card trick land, the Autopilot Bottom Palm is the easiest, most deceptive method we’ve ever seen.

One of the big secrets behind the Autopilot Bottom Palm – and almost every intermediate or advanced sleight in magic, is the concept of Micro Moves.

What is a Micro-Move?

It’s a single secret action that takes no more than a moment to accomplish. That’s important, because we can only direct the audience’s attention for one moment at a time, so any sleight that takes longer than a single moment, must be broken up into smaller units…so we can use our core Attention Jacking tactics of Open and In-transit actions to direct the audience’s attention away from the deck during each of the two Micro-Moves that combine to form the Autopilot Bottom Palm.

Card Trick Micro-Move #1: Preparing the Card for Palming

In the first secret Micro-Move, you’ll transfer the deck to the right hand as you prepare the card for palming.

Starting with the deck in dealing position, move the pad of the left first finger to the face of the deck near the upper right corner of the deck. (See Pic 5)


magicians card tricks

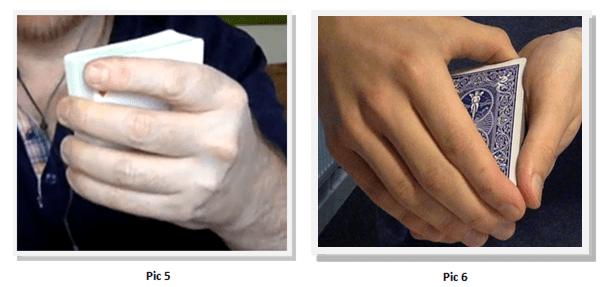
As you bring your hands together in front of your body, use the right first finger pad and thumbpad to grasp the deck at the left edges, the right first finger contacting the left thumb at the front edge of the deck and the right thumb contacting the ball of flesh at the base of the left thumb. (See Pic 6)

The right thumb holds the cards firmly. The left hand releases all pressure on the deck except for the first finger pad pressing up on the bottom card at the upper right corner. Hold the bottom card still with the left first finger as the right hand rotates the deck counter-clockwise, using the bottom left corner of the bottom card as a pivot post, so the deck rotates away from the bottom card. This is a slight action.

tricks with cards
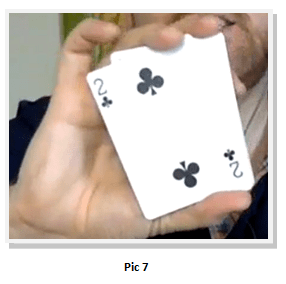
The moment the upper left corner of the bottom card lands between the first and second fingers of the right hand, you’ll find the right finger need only slight pressure to hold the card in place. (See Pic 7)

This action is invisible, but you’ll use simple Attention Jacking Concepts to make sure the audience never suspects a thing. As your left first finger moves into position below the deck for the move, shift your gaze to the spectators on your left as you say something to them. Then, a moment later, as the left hand releases the deck, use it to gesture toward those same spectators on the left.

Note: This gesture is referred to as the Open Action. The secret action of shifting the bottom card of the deck in readiness for the palm is the secret action, done In-Transit. These technical terms were coined by the spanish master Ascanio, but simply put, it means that your gaze shifts and draws (or at least splits) the attention of the audience.

The transfer of the deck from hand to hand is now justified as it seem motivated by your desire to ‘free up’ your left hand and gesture toward the spectators on your left. The In-Transit Action – transferring the deck as you prep the bottom card for palming – becomes psychologically invisible.

That’s important, because unmotivated actions raise suspicion. And once the audience is on ‘high alert’ they start tuning out what you say and focus only on your hands. Once that happens, your odds of amazing the audience go down drastically.

Conjuror Community Member Extra

Access your complete Autopilot Card to Pocket video training now in Conjuror Community. It’s the easiest method ever devised. You’ll be ‘palming cards like a master’ in no time!

Click here to access your Video Training.

Not a Conjuror Community member?
Click here to learn more about Conjuror Community.

Micro Move #2: The Easy Palm Action

Now you’re all set to palm the bottom card of the deck in your left hand without any suspicious actions. In fact, you’ll barely move a finger! To the audience, it will look as though you simply place the deck back into your left hand.

Before you bring your hands together, take a moment to revolve both wrists rightward so both palms are slanted rightward and face each other. When you look down, you should be able to see both of your thumbnails. (See Pic 8)


card tricks easy palm

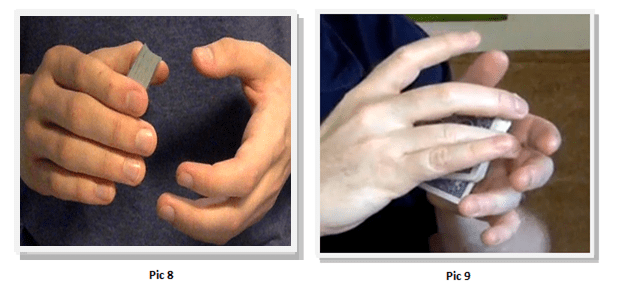
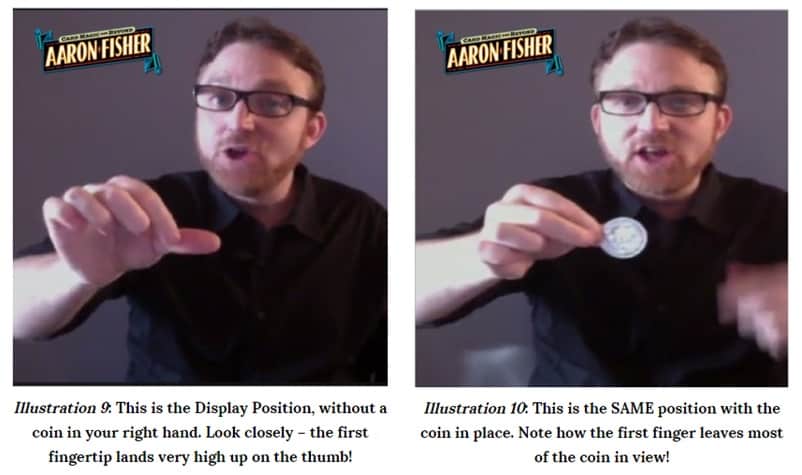
Now bring your hands together so the left third finger tip contacts the upper right corner of the bottom card (at this point the corner points down to the floor – so don’t let that confuse you!). (See Pic 9)

As the third fingertip grasps the corner of the card, deposit the back left corner of the card somewhere close to your original ‘hypothesis position’ at the base of the left thumb. (See Pic 10)

pic10and11

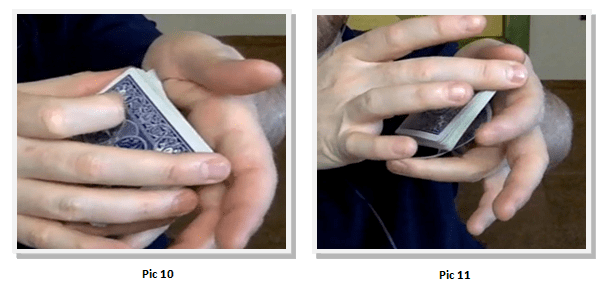
As you feel both corners in secure contact with the left hand grip points, curl in your third finger and the card will snap away from the back into Bottom Palm Position. (See Pic 11)

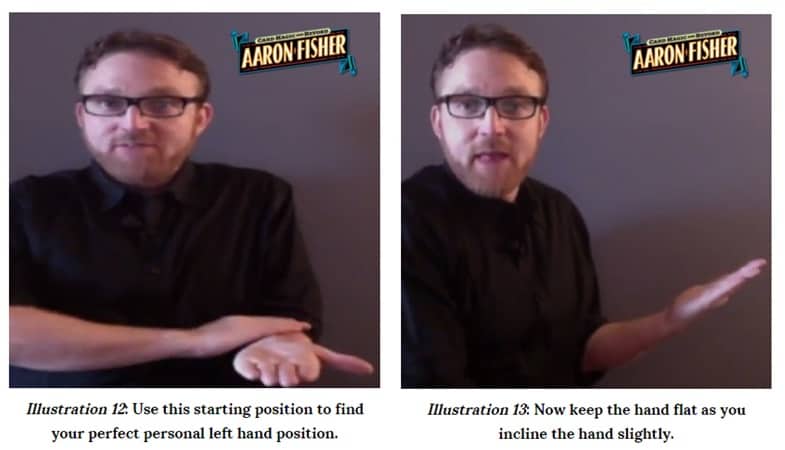
Now complete the action of placing the deck in the left hand by holding the deck securely with the left thumb on the left side, with the second finger on the right side – and the first finger at the front of the deck. From the front, it looks as though everything is normal. (See Pic 12)

pic12and13

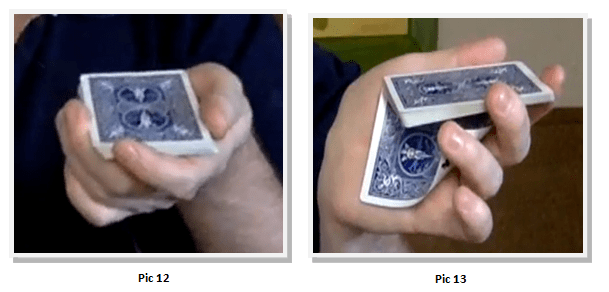
Don’t let the view from behind scare you! (See Pic 13)

pic14
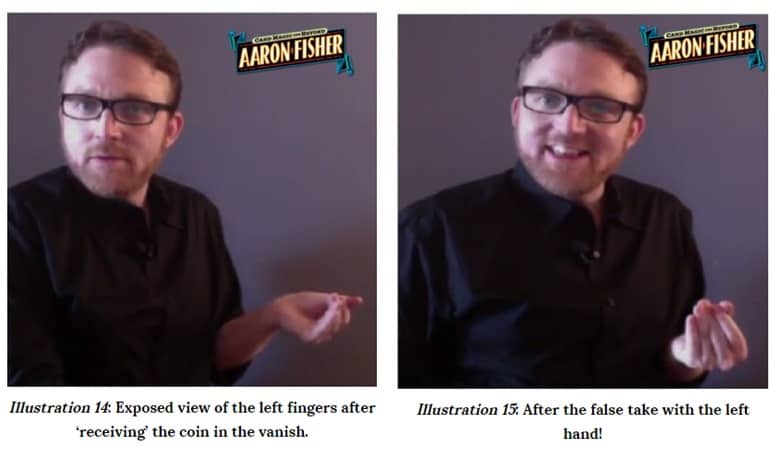
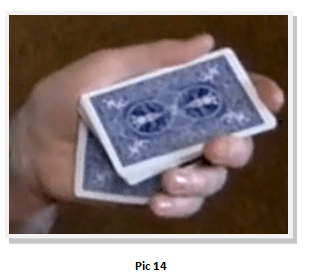
If there are people on your right, don’t be afraid to close the third and fourth fingers up around the right side of the deck to make sure there’s nothing to see! (See Pic 14)

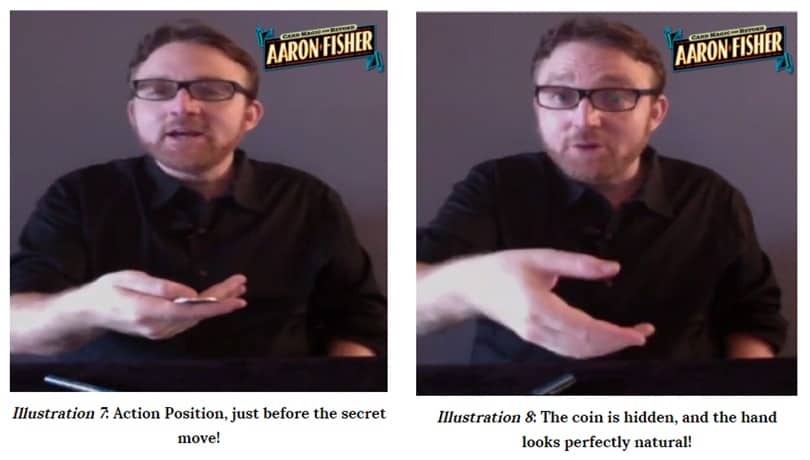
The palming action is totally invisible and natural. Even so, we use the same Attention Jacking Strategy to ensure no one in the audience gives it any thought. As your right hand moves to deposit the deck in the left hand and palm the card , shift your gaze to the right and speak.

Then, as you complete palm and your right hand releases the deck, use the right hand to gesture toward the right. Just as before, this Open Action – preceded by your shifting gaze – justifies the In-Transit transfer of the deck and ensures even the most attentive or difficult spectator won’t have a clue what you’re up to.

Now the card is safely held in bottom palm below the deck. We suggest you take advantage of the safety this position gives you and wait at least a few moments before stealing the card away from the pack. This action is known as ‘retiring’ with the card, and thanks to your unsuspicious movements up to this point, you’ll have an easy time of it.

Simply ask a person to shuffle and take the deck with your right hand and give it to them. Or use the right hand to slap the deck on the table. As you do, curl the left fingers and naturally drop the left hand to your side or lap (so you don’t seem to rush!) and then move to produce the card from your pocket, wallet, envelope or any place you desire.

Filed Under: Card Tricks

Easy Card Magic: The 7 Point Natural Dealing Position

February 7, 2016 By Aaron Fisher

learn-easy-card-magic

Easy Card Magic Mastery: The 7 Point Natural Dealing Position

Do you want to learn easy card magic and start to master easy card tricks? Did you know how you hold the deck has an enormous effect on every single trick or sleight you want to learn?

In fact, at least 80% of clients I work with discover, during our first meeting, that by making a few simple adjustments to their normal dealing position….

They can make drastic improvement in the success and ease of every sleight they pick up!

Easy Card Magic Amazement In 10 Minutes

As you’ll see in this video, there are no sleights involved here. But the way you hold the cards when nothing is happening actually dictates your success or failure with any sleight. Fans of my popular blog post called “How to Do Easy Card Tricks” already know the importance of holding the deck correctly.  These 7 points will help you understand this even better.

Each one of the 7 points gets you closer to easy card magic – makes your sleights easier to use successfully – and at the same time – eliminates suspicion before it ever arises. And that’s one of the major keys to performing card magic that not only fools your audience, but amazes them.

This video is only ten minutes – and if you want to perform amazing card tricks, you should make sure to watch it. And if you’re an experienced card magician already, it’s safe to say you’ll find some very useful information here you won’t want to miss. As you practice, keep these tips in mind. Enjoy!

VIDEO FROM CONJUROR COMMUNITY

Now that you have the 7 Point Natural Dealing Position, you may find it helpful to see how each point can make or break the success or failure of the most important sleights in any card magician’s toolbox.

easy-card-magic-5

Point 1: The Thumb Position

Passes and Half Passes

It’s almost impossible to neatly square the deck in a single motion unless your thumb is in this position. That means sleights like the Classic Pass, the Gravity Half Pass or countless other sleights won’t be possible – because your thumb won’t be there to square the pack for the move.

The Double Lift and Turnover

The position of the thumb allows you to square the cards perfectly and easily. If you’re thumb floats up, you won’t have any way to square the double card before the switch. So if your thumb isn’t normally in the position shown in the video..BINGO.

You’ve just discovered a big clue that make make your double lifts seem like you really only have one card. We are getting closer to easy card magic…

card-magic-6

Point 2: The First Finger

Keep it in front of the tip – above the top edge of the pack! Many of my students find this challenging. After a few weeks, I notice the finger has dropped a bit and is no longer in contact with the front edge of the deck.

Double Lifts and Turnovers

It doesn’t matter whether you want to do a simple two card push off or a more Advanced Robert Houdin Break (the choice of most Top Masters for almost a century), this position keeps the double card aligned at the front of the deck. This is especially crucial when you’re first mastering these all-important techniques.

Spreading the Cards

Without the first finger at the front of the deck, the cards move forward – and you won’t be able to spread them cleanly. And if you can’t spread them cleanly – you want square them cleanly.

Hofzinser Spread Cull

That means you won’t be able to perform the Spread Cull, which allows you to secretly control any cards you want as you spread through the pack, because you simply won’t be able to push them off the deck straight.

Card Controls

If they involve the spread, you’ll have trouble, because without the first finger rising above the front of the deck – the pack won’t be squared and ‘ready to go’ as your hands come together and close the spread.

The Pass, Gravity Half Pass and Hermann Turnover Pass

Virtually all experts, starting with Dai Vernon himself, find the first finger position invaluable if you want to perform a pass without anyone seeing your fingers move. As the right hand takes the pack to do any one of these moves, keep the left first finger still by pressing it against the back of the right second finger. This key touch was first shared by Dai Vernon himself, and it’s VERY important.

magic tricks easy

Not a Conjuror Community member?
Click here to learn more about Conjuror Community.


magic-easy-cards

Points 3,4 and 5

Keeping the second, third and fourth fingertips just barely above the right side of the deck is the most important thing to focus on immediately. Rehearse this…get this one right… and your card magic will start to progress immediately. Without these fingers in the correct positions, you’ll have trouble with:

Dealing

With your fingers sticking up like bananas over the right side of the pack, you won’t be able to deal a card, or even push one off the deck.

Spreading

This is the same problem we just mentioned, but multiplied. The correct finger positions ensure that your second, third and fourth fingers don’t stop cards coming off the deck when you spread the cards between your hands.

So, quite literally, you need these exact positions in order to have someone pick a card!

Breaks

Most important, you’ll never be able to hold a left fourth finger break without these points. If the fingers stick up, the moment your pinky moves to hold a break (near the top, bottom or middle of the deck doesn’t matter) – your pinky will seem to vanish! Great Trick?

Yes – it’s awesome to make your finger disappear :), but it will KILL your card trick. The positions in our 7 Points ensure the deck looks the same whether you’re holding a break or not…and that’s a big piece of the puzzle. Now, we are getting even closer to easy card magic…

easiest-card-magic

Point 6 and 7

The “down and to the right” slant to the deck makes all of your magic more effective.

Standard Dealing Position

Puts tension in your hand and draws audience focus to your hand – even when you aren’t doing anything sneaky. The relaxed position of the 7 Point Natural Dealing Position uses no tension, and allows you to connect with the audience.

Bring the deck parallel to the table or floor only when you want the audience to focus on the cards!

The Blank Slate

The down and rightward position of the deck facilitates each and every move you do – because it show you how to hold the cards in ‘neutral’. In this position, the cards rest in a bracket created by the first and second finger.

This is much different than in a standard ‘dealing grip’ where the cards are parallel to the floor. In this case, it’s almost impossible to avoid putting pressure on the cards with your left thumb or fingers. That pressure isn’t helpful to any of your handling – from spreading the cards to secret moves.

When you take all the pressure off the cards by using the 7 Point Natural Dealing Position, you create a ‘blank canvas’. Now, every finger position you use and every move you make won’t be impeded by pressure you’re placing on the cards without even knowing it.

For this one reason alone, I suggest you try out the 7 Point Natural Dealing Position. Starting from this new ‘blank canvas’, you’ll discover many sleight you thought were difficult may immediately become easier. And that’s something every magician loves!

Now we need your help! Let me  – and your fellow readers – know which tips you found the most helpful. I’d also love to read YOUR performance tips – after all, there are many paths to great magic, and we want to explore them all! I can’t wait to read each and ever comment you post!

Filed Under: Card Tricks

Learn How to Do Magic Tricks – Coin Magic Training

December 24, 2015 By Aaron Fisher

Learn How To Do Magic Tricks

Coin Magic – Core Training 

Learn How to Do Magic Tricks: The Vanishing Coin Trick # 1

learn-how-to-do-magic-tricksDo you want to learn how to do magic tricks? Learning how to do magic is easiest when you have a great place to start. So, we’ll begin with the most basic of all tricks. It’s also one of the most magical: making an object disappear!

In this article, we’ll show you how to make a coin vanish completely.

(If you are interested in easy card tricks, check out this other article here.)

And we’ve included several video tutorials to make the magic easy to understand and master!

Why start with a Coin Trick?

Great question! There are a few reasons. First, coins are one of the easiest objects to start with. They’re also normal. In fact, almost everyone you meet will have one in their pocket, and that alone makes the magic much more amazing.

But the best reason is this: Not only does the vanish of an ordinary coin have the power to amaze anyone, it also has the most important secrets of magic embedded inside.  We’re not going to just ‘reveal’ the secret behind the trick. Far from it.  In the videos and instructions you’re about to enjoy, we’ll show you how to use the secret art of misdirection to create more than a trick…an illusion that seems just like real magic.

Before we start, here’s a final note. You can start astonishing with this miracle very quickly, but it’s important not to get frustrated if it feels as though you’re not ‘getting it’ the first time through.

We’ve broken the entire thing up into ‘baby-steps’ to make it nice and easy. Just follow along, and you’ll master a very cool coin trick…and at the same time, foundation you’ll need to pull off magic’s greatest illusions!

Materials:

learn magic tricksStart with a silver dollar. You’ll be able to do this trick with any coins, but you’ll actually have an easier time if you start off with a bigger coin!

We recommend an Eisenhower Dollars, because it’s nice and big and unlike older silver dollars, Eisenhower Dollars are very inexpensive.

Try and get a newer coin, that hasn’t been worn down around the edges. As you’ll see shortly, coins with freshly milled edges are easier to ‘palm’.

Pro-Tip: Whenever we start learning coin tricks, we can expect to drop our coins many times for the first few weeks. We suggest that you wait for this phase to pass before you start spending money on coins with a high silver content. Real silver coins look GREAT, but they’re very expensive.

And remember, you can practice and perform this trick with any coins you have lying around. Bigger coins are just easier to learn with…plus, bigger objects make for more impressive magic!

learn how to do magic

Have a wand/talisman/stone of your choice.


How to Find Your Personal Finger Palm Position

Phase 1 

1. Watch this Video to see how your personal palm position will look and feel. Then follow the steps below to create a palm position just for your hands….so natural, no one will ever suspect you of trickery!


2. Start with your coin at the base of your RIGHT fingers. The coin should rest pretty evenly on your middle and ring fingers. Make sure you’re comfortable with how the coin feels.

coin magic

3. Form your three middle fingers into ‘Xylophone Position’. Your palming finger – your third finger – sits in the middle of a three-finger combination that looks like a xylophone. Extend your pointer finger fully and curl back your last three fingers to grip the coin.Your fingers should be staggered so the finger on top sticks out slightly more than the one below it. When you are starting to learn how to do magic tricks, this is an important hand position to remember.

Illustrations 3 and 4 below show exactly what this looks like to the audience.

coin magic tricks

4. Curl back your pinky finger. Imagine a string pulling your pinky toward your wrist. Don’t curl it too far, though, or the coin will show. If you have smaller hands, start your palm position with the third finger palming a bit of the coin (move the coin closer to your pinky).

Note: For detailed video training on finding your own personal palm position, check out our free training here.

5. Loosen up! Try to relax each muscle in your hand so the palm position doesn’t feel forced or tense. After you find a position a position at looks natural and feels comfortable, begin softening your grip, releasing tension, until you hand seems empty…even to you!

Phase 2

When you practice you palm position, you’ll get the strongest results from practicing without any coin at all! That may sound strange, but practicing without a coin will make the palm position feel natural to your hand. The more natural it feels, the more normal it will look to your audience when you are in fact palming a coin.

To make sure the position is natural, grasp the coin between your thumb and pointer finger. Your middle finger will look like it’s holding the coin when it really isn’t, and that will help you conceal any objects in your hand (see illustration 4 above).

How to Find Action Position

First watch the clear video training above. Then use the following instructions to keep track of the details that make the magic!

1. Start your routine with your best right-hand finger palm position.

2. Cup your hand naturally in a horizontal “C.” You’ll probably find this position a little uncomfortable at first. In fact, many people have a hard time keeping the right hand horizontal.

But remember that this is a relaxed finger palm, not an “activated” one. Don’t contract your muscles in this position. Look in a mirror or camera to make sure your hand forms a “C” shape.

coin magic position

2. Use your right hand to rotate the coin forward so that its bottom edge rests along the top edge of your pointer finger.

3. Going into the flip-over action, angle your right hand slightly back towards you. The coin should rest like an easel with your thumb holding it down. Your audience should see only the edge of the coin.

coin magic action position

4. Keep your thumb subtly in position once the coin flips back. If you do this correctly, the coin should fall right into palm position.

How to Find Display Position

Again, watch the video training above, and then follow along, coin in hand, to get the details that follow!

Remember, we started by finding your personal palm position, then we ‘backtracked’ one step to find an ‘Action Position’  that ends with the coin in your unactivated, or open, finger palm. Now you’ll complete the puzzle by finding your personal Display Position. From your audiences perspective, this is where the whole illusion begins!

We call this Display Position because it will ensure your audience can clearly see the coin, and at the same time, facilitate easy movement to Action Position and finger palm after that.

1. Before you attempt Display position with a coin in your hand, first try this exercise — Press down on the joint of your thumb with your pointer finger. Your thumb should be straight with your finger curling down.

coin magic display position

2. Now do the same thing, this time actually holding a coin! Pinch the coin at the very edge with the tip of your pointer finger near the joint of your thumb. Most of the coin will show, helping your audience retain the visual.

3. Tilt your right arm forward and back so that the coin is reflected in the light.

Alternate Method:  Place your thumb in a 10 o’clock position and keep your pointer finger straight. You’ll have the same control but a much more natural look. (As you learn how to do magic tricks with confidence, you’ll often discover alternate versions of many tools and positions.)

coin magic tricks
Illustration 11: Looks almost identical to the audience, but you may find this method works better for you!

After you get a bit of practice in the three areas we’ve just covered: finding your personal finger palm position, Action Position and Display Position, you’ll have the entire right hand sequence for one of the most astonishing vanishes ever devised.

Secret Training Strategy: Give the steps above a few weeks of practice to become comfortable and fluid. Once you’ve done that, you’ll be ready to add the left hand action to the mix and create the finished illusion of making a coin disappear completely!


learn how to do magic tricks


 Creating the Magic: Your Left Hand Action

1. Start with your empty left hand.

2. Pin your elbow to your side and extend your forearm at a 90-degree angle.

3. Your entire arm and hand should be completely flat, palm up.

starting position coin magic

4. Use your right hand to move your left hand up 5 degrees on an angle. Your hand should still be flat.

5. Using your right hand, pretend to drop a coin in your left hand. Bend your fingers at the inner joints to hide your palm and create an illusion of weight.

coin magic vanish

6. Roll your thumb behind your fingers so the backs of your fingers are facing the audience in a grasping position.

7. Reveal the empty hand.

Note: Even if it takes you a few weeks or longer, practice your palm and action positions until you have them down pat. Our next few lessons build on top of what you’ve already discovered, so to learn how to do magic tricks, starting with this incredible coin trick, you’ll want to be comfortable with the basic moves before you start to focus on showmanship.

Remember As  You Practice…

  • Practice the steps in the order we’ve taught them.
  • Coins reflect light…and that’s crucial to the effect.
  • Every time you practice palm position, double-check your fingers’ xylophone configuration.

Introduction to Misdirection

Once you have the basic finger positions described above, you’re ready to coordinate the left and right hand actions, and turn this effect into it miracle.

Here is a short list of the key things to keep in mind when you intend to perform this Coin Trick for an audience.

  • Remember to have an actual connection with the audience; don’t fake it!
  • Great close-up magic is more like a conversation than a performance.
  • Remember the importance of your gaze in visually connecting with, and directing, the attention of the audience. After you connect with an audience member, be sure to bring your gaze back to the object of the effect. Learn how to do magic tricks.
  • Your constant movement of focused attention is the first step to successful misdirection. If you don’t tell the audience which direction to go with their mind, they’ll pick their own, and that can work against you.

For more information, check out Juan Tamariz’s book on misdirection – The Five Points of Magic.

Misdirection Frame By Frame: Attention Jacking

Here’s an outline to help you keep track of the crucial information in the video above.

Open and in-transit sequences:

  • Focus on your spectator (A) then shift your gaze to your object (B), such as a coin.
  • Go back and forth from A to B.
  • Shift your gaze from A to your wand (B2), which is the object of the open action (i.e., where you want the audience to look).
  • As you look at the object of the open action, you reach for that object and do the secret move in transit.

The Coin Vanish Frame By Frame:

Frame 1: Magician says hello to a spectator (A).

Frame 2: Magician looks at the coin (B).

Frame 3: Audience looks at the magician’s face as she returns her gaze to A.

Frame 4: Magician shifts gaze to wand (B2), and audience sees the wand.

Frame 5: Audience sees the magician’s face bringing them back to B, which they don’t know has changed.

Frame 6: Coin disappears. This leaves the audience with pictures of the magician’s face, the coin, the wand, and then the coin vanishing. Their visual memories omitted anything in between.

Structure & Presentation

Technique and misdirection are just the beginning. If you truly want to learn how to do magic tricks that astonish, you’ll want to incorporate two more elements to the trick.

With a strong structure and clear presentation, you’ll have everything you need to perform miracles that can astound anyone!


  • Structure can be in a single effect that grows into a more complex routine or in how separate routines are put together in a show.
  • Your Presentation will give you the confidence to perform in front of an audience with a flawless routine.
  • The layers of a routine are: Technique, Attention Management, Structure, and Presentation. A great presentation will naturally fill in the gaps if the first three elements are well-aligned. The more you work on these four layers, the better your magic will become.

Internal Monologue and Authentic Discovery

Your Internal Monologue is the silent conversation you have with yourself to make sure you’re holding the attention of the audience.

Note: It’s easy to confuse your internal monologue with the actual presentation. To learn how to do magic tricks like a real pro, avoid saying things you can simply show the audience instead!

Authentic Discovery is the ability to see each audience member and object in your show for the very first time…any time.

Remember to be patient with yourself! If you want to learn how to do magic tricks, it will take time. These skills could take four or five months to perfect, so don’t get frustrated. Enjoy the journey and the rest will come in short order.

Do you want to learn how to do magic tricks? Please leave a comment and tell us what you want to learn.  I read each and every comment – and I look forward to reading yours!


Filed Under: Coin Tricks, Magic Tricks

Magician Profiles

October 4, 2015 By Aaron Fisher

Discover Your Personal Magic Profile

profilesOne of the things I’ve discovered, working with my online students, is that each one of us is drawn naturally to certain archetypes – again that’s one of those psychology words – but  what it comes down to is: People who get interested in magic tend to fit loosely into one of the profiles I’m about to share with you.

And these profiles don’t just apply to my students, but to most, if not all magicians.  As I break these different styles down, ask yourself which one best describes the way you approach your magic right now.

Again – no person is an average, so as you read these you may see that you may fit one of these profiles to a tee – but it’s just as likely you may see elements of two, or all three in yourself.


If you are interested in this article, you should check this out! Get Video Training About This Exact Topic Now >


Magic Profile # 1: The Natural Born Showman

NaturalBornShowman
This person was born with the gift of gab.  They are comfortable talking with people, and in front of people…they come with that setting directly from the factory, or it develops as they grow up. But either way – when these folks get into magic,  they naturally gravitate toward presentation and performance. That drives their approach to magic – from the tricks they choose, to how they perform them.

Here’s how a Showman Type magician might naturally divide his or her focus among the core elements of magic – by naturally favoring their strengths.

Just fyi – When I first decided to do magic as a boy (the first year or so), I loved doing tricks for anyone and everyone because I fit this kind of profile.

65% for Presentation
20% for structure
5% for misdirection
10% for technique

Magic Profile # 2: The Thinker

TheThinker
This person doesn’t tend to focus on performing magic as much as the Natural Born Showman, but he/she is not necessarily obsessed with every detail of every move. They like to watch, and learn and soak up every bit of knowledge. It’s not as easy for the Thinker in to take their knowledge and use in  performance.

But as a result of his approach to taking it all in, the Thinker develops a sense of what makes a good trick. In a sense, and in part because he’s not a natural ‘song and dance man’ kind of person, he gets to see more of the big picture – that draws The Thinker naturally toward the element of structure.

A Thinker might focus their attention breakdown among the 4 core elements of magic like this:

5% for Presentation 
70% for structure 
5% for misdirection
20% for technique

Magic Profile # 3: The Mechanic

TheMechanic
Now we have the Mechanic. The mechanic likes to focus on the moves – he loves the feel of the cards in his hand and he loves to practice and perfect every detail.

After I was in magic about a year or two at most, I had performed every trick in the magic shop they would see me with the help of my Inner Showman, but then a funny thing happened.

Over a period of a few months, I fell in love with card magic in particular. And as that happened,   My Natural Born Showman seemed to fade away overnight –  I began thinking like The Mechanic.

Just to be clear –  I wasn’t  good at any moves or sleights.  But my approach changed.   I didn’t want to PERFORM magic very much at this point – because The  Mechanic Archetype – or Profile –  is interested first and foremost on building and perfecting his tools.

So after my interest in card magic got crazy serious,  my Attention Profile looked something like this:

0%  for Presentation
0%  for structure 
0%  for misdirection 
100%  for technique

So here’s the thing, we each have an inner mechanic, an inner thinker and even an inner natural born showman. They’re in there somewhere. But whichever one we feel most comfortable with tends to run the show – unchallenged – in some cases for years, or a magicians whole life.

How to use Your Magic Profile

If your end goal is to truly amaze people with your magic, try this quick exercise.

The first thing is see which one of the profiles we mentioned above fits you the most. Just like we did earlier, put a number – a percentage – of your magic energy you place into each one of the four elements –  technique, misdirection, trick structure and presentation.

Many of us are drawn to two or three of the elements naturally – and apply little, or no attention to one or two. Just do your best to examine your personal approach AT THIS MOMENT and put a number that should go by each element. And do please be honest with yourself – or you won’t get accurate and helpful numbers.

That quick exercise will show you immediate insight into where you put most of your energy – and where you might be neglecting a crucial area, or two,  of your game.

If you see a low number in any area – like anything near or under a ten, you can add immediate power to the effect of your magic by simply adding a bit more attention to the undervalued element.  If you can just get each of those numbers above a ten for a start – you’ll feel the overall effects every time you do magic.


Filed Under: Magicians

Two Tips for The Ambitious Card

October 4, 2015 By Aaron Fisher

The Ambitious Card…

Is one of the favorite tricks in most magician’s arsenal.  With an unprepared deck, you can cause the spectator’s card to rise to the top of the pack.  Again and again, their card rises to the top – eventually leading to a grand finale of some sort.  In this video, Aaron explains two ideas for the ambitious card which you can incorporate right away.  For more episodes of The Card Magic Minute, check out Aaron’s Youtube channel.

If you really love the ambitious card, you should check out the mega-post on How To Do Easy Card Tricks… where you can learn tons of card tricks that you can perform right now!

ambitious-card-trick-2


Filed Under: Card Tricks

  • « Previous Page
  • 1
  • …
  • 3
  • 4
  • 5
  • 6
  • 7
  • …
  • 9
  • Next Page »

CONNECT WITH ME

Aaron Fisher is widely considered one of the world’s top sleight-of-hand artists and his coaching programs have helped thousands of magicians.

easy card tricks

How to Do Easy Card Tricks | Part 1

Why The Paper Engine 20th Anniversary Edition Took So Long (And Why It Had To)

Thumb Tip Magic Tricks

How To Do The The Turnover Pass: EVERYTHING You Need To Know

sleight of hand

Sleight of Hand: The 7 Strongest Sleights for Card Magicians

Complete Card Magic

Complete Card Magic Blueprint: 9 Most Popular Techniques

Magic Tricks

Magic Tricks: 22 Essential Sleights and Your Complete Card Magic Blueprint

Proven Practice Tactics

3 Proven Practice Tactics for Busy People

magic clubs

Magic Clubs: Is Joining One Right For You?

suzanne magician

Magician Suzanne Shares Secrets to Performing Successful Magic

How to Become a Magician

© 2025 Aaron Fisher Magic

  • Privacy Policy
  • Terms & Conditions